The Front Shocks & Struts: The Ultimate Guide
You may not give your vehicle's front shocks or struts much consideration until they begin to fail, but it's important for any driver to know what to look for when it's time to get your car serviced. Your ability to drive your car and the overall comfort of your ride is affected when the vehicle's shocks and struts start to wear out. Damaged front shocks and struts can also damage other parts of your vehicle, resulting in more costly repairs or replacements. Let’s look at what front shocks & struts do and why it’s so important to make sure they’re performing properly.
What Are Car Front Shocks & Struts?
The shock and strut perform the same basic job on a vehicle, damping the movement of the spring and stopping oscillation and bounce. Even though they do the same thing, shocks and struts are fully different parts. A shock cannot be utilized to replace a strut and a strut cannot be used to replace a shock. An automobile would have either a shock or strut at each wheel, never both. Each and every vehicle is designed with either shocks or struts and your vehicle's suspension cannot be changed to use the other.
If you want to know more about car shock and struts, and why you need them, visit our What is the difference between the shock absorbers and struts section.
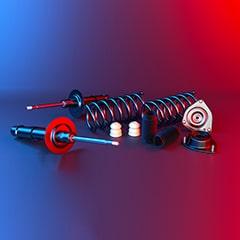
What Are The Important Features Of My Car Front Shocks & Struts?
Do you want to know the essential features of front shocks & struts? Then you have arrived at the right place. Have a look below to know the important features of front shocks & struts
Twin tube design should offer restored ride quality and handling.
Multi-shim valve systems are “vehicle specific” for superior-handling ride control and comforts as opposed to the less expensive “on-off” valve that has utilized a lot of shock companies for decades.
Piston rod is hardened, micro-polished and then double chrome-plated for durability.
Twin tube design should provide an outer tube to protect the working parts from damage. Tubes are made of cold drawn extruded steel.
How Does My Car Front Shocks & Struts Work?
Are you searching how the front shocks & struts actually work? Have a look below to understand its working:
Shocks and Struts would help in stabilizing the movements of the vehicle, which would enhance the control when you would turn, brake, accelerate or encounter uneven road surfaces. Today’s vehicles use shocks, struts or a combination of the two. The basic difference is that a shock is an independent component, while the strut combines the shock and other features in a single structural unit. Both help in stabilizing the vehicle and keep the tires in contact with the pavement. In the absence of shocks, your vehicle would start bouncing down the road. How long would you expect your shocks or struts to last? It depends upon the driving on rough or unpaved roads, towing a trailer or carrying heavy loads, can shorten their functional life.
What Are The Common Car Front Shocks & Struts Problems?
Do you want to know some frequent problems which might occur in the front shocks & struts? Look below to know some frequent problems with the front shocks & struts:
The Vehicle Bounces - The coil springs would dampen the transfer of energy when a vehicle drives over bumps, potholes and uneven roads. The vehicle’s shocks and struts would help in controlling the movement of the springs so that the wheels don’t move up and down excessively. When these parts would be stuck, damaged or loose, the tires lose contact with the road as the car is driven, then it would result in a bumpy, uncomfortable ride.
The Front-End Dives and/or the Rear Squats - It is the shocks and struts which would help in keeping the vehicle stable during acceleration and braking. Now when the automobiles shocks and struts would be damaged, then the front end can dive upon braking while the rear end squat during acceleration. It would happen when these parts would not be strong enough to handle the weight of the vehicle.
The Vehicle Exhibits Signs of Body Roll - Similar to how a vehicle can dip and squat during braking and acceleration events, the stability of the car might also be compromised during cornering. If the shocks start going bad, then the body will feel like it is leaning into the turn - even on slight turns. Again, it can be a safety issue which would need immediate action since it can impact braking and steering effectiveness.
You Hear Unusual Noises - One of the tell-tale signs of a vehicle’s suspension system which would need service is unusual noise. Now as the shocks and the bushing would wear, then they would lose their ability to properly support the strut. It would result in the bottoming out of the strut. Now when the strut would bottom out, the metal-to-metal contact would cause a knocking sound that emanates from the front or rear wheels.
Tire cupping, or scalloping, can be another cause of suspension-related noise. When car’s shock absorbers would go bad and cause the tire to recoil faster, then there can be patterns of wear that alternate like a series of peaks and valleys. These variations in tire tread would lead to a bouncing noise which can be detected during a test drive.
What Are The Symptoms Of Bad Front Shocks & Struts?
There are a few things that might cause your front shocks & struts to malfunction. Watch for the following symptoms if you suspect a bad front shocks & struts:
Symptoms of bad shocks or struts include:
Badly cupped tires and/or noticeable tire shaking, wheel shimmy or vibration after hitting a bump.
Suspension bottoming on rough roads or when backing out of a driveway.
There can be a bouncy ride.
Body sway or rocking when cornering or driving in strong crosswinds.
Nose dive when braking hard.
Fluid might start leaking from a strut or shock.
Which Tools Do I Need To Repair My Car Front Shocks & Struts?
It is said that a workman is only as good as his tools, and it is definitely true when it comes to the car bodywork. It is vital to have the right tools to repair your car front shocks & struts or else a straightforward job would turn into constant headaches. So that’s why we have listed out some invaluable tools below which you will need while repairing your car front shocks & struts.
Jack
Jack Stand
Breaker Bar
1/2 Socket Driver
1/2 Metric Sockets
Rubber Mallet
Magnetic Pickup Tool
Magnetic Parts Dish
Spring Compressors
Which Top Brands Front Shocks & Struts Parts Should I Choose?
If customers trust a brand, then it would make them loyal, and if they are loyal, then they will surely buy more. We know well that customers want comfort, cheerfulness and satisfaction in their lives and that’s the reason we offer top quality auto parts brands to our customers. We provide a positive experience to our consumers from the brands which we are offering so that they can form an opinion that a particular auto parts brand is trustworthy and would give them peace of mind while they are purchasing it for their car. Here we have listed out some top brands for car front shocks & struts.
Fabtech Front Shock & Struts
For more information about Top Brand Shocks & Struts, visit our What Are The Top Brands Of Shock Absorbers I Can Choose? section.
Which Parts Are Related To My Car Front Shocks & Struts?
It is very important to arm yourself with information before you shop for any auto part. We are here to help you dive deep into the names of the front shocks & struts related parts.
Front Cartridge
Front Shock Absorber
Front Strut Spacer
What Is The Repairing Cost Of My Car Front Shocks & Struts?
More than any other failure in a car, there's almost nothing that's quite as heartbreaking as a completely damaged car front shocks & struts. Now when we talk about the replacement cost, it might vary a lot even on the same car depending upon its performance, labor cost, brand, etc. If you want to substitute your suspension shock or strut assembly, then it would generally range between $408 and $441.Talking about the work expenses, they would range between $123 and $156 and the parts would be valued somewhere around $285. The estimated cost would not include taxes and fees.
What Are The Steps Of Changing My Car Front Shocks & Struts?
Do you want to change your front shocks & struts on your own? Then have a look at the steps of changing the front shocks & struts below.
Start with the Basics
It is very essential to note that you would install the right type of shocks for your vehicle to perform as it was intended.
Now before you get started, then just make sure that you have a large, level workspace and plenty of time to finish your project. Your vehicle should be in a park with the emergency brake set. It would also be a great idea to slightly loosen the lug nuts before you jack up your ride, since the lug nuts require a lot of pressure to break free. The appropriate jack-points should always be used, which could be found in the owner’s manual. You would also want to place a jack-stand under the vehicle. For even more security, you should chock the wheel on the opposite corner of the vehicle to prevent rolling.
The shocks or struts which you would purchase may or may not come with detailed instructions for installation. Now if they do, then you should always follow those steps to get the best results. Also make sure that the shocks and struts should only be replaced in pairs (both fronts at the same time, or both rears).
When you replace your shocks, then you would also get a great opportunity to check your brake pads, control arms, axles and CV shafts for torn boots and free play. Now that you would be properly prepped, then have a look at the installation process below:
How to Install Shocks:
The first tire should be removed and then you should locate the shock assembly. There are a lot of shocks which would attach from the axle or lower suspension.
The old shock should be held in place by two bolts. Then remove the horizontal one on the bottom first, utilizing a ratchet on the nut and a backup wrench on the bolt-head to keep it from spinning.
There might be a need for a long flathead screwdriver or pry bar to finagle the shock from its perch.
The new shocks and new rubber bushings should be installed which should come pre-installed. A thin coating should be applied to either side of the shock eyelets to make it easy to fit the new shock back in.
The new shock should be placed in the vehicle by aligning both ends of the shock. For shocks with two bolts, it would be easier to install the top bolt first. You should not tighten the bolts and nuts until both would be in the place. A rubber mallet or plastic dead-blow hammer would come in handy. You should then tap on gently on either end to work the new shock into position.
Now once you would think that you have the shock positioned, then an alignment dowel or drift pin should be used through the mounting holes and through the shock eyelets. It would ensure that the shock is properly aligned, so your mounting hardware would install very easily. Then that way, you would not damage any threads.
All the bolts and nuts should be tightened to the appropriate torque specification (can be found online or in your service manual). The retaining wire or plastic tie should then be cut. The wheel should then be re-installed and then you should tighten the lug nuts. These procedures should then be repeated for the other tires as well.
How to Install Struts:
The installation of the strut is a bit more complicated, necessitating the use of two less-common tools-a spring compressor and a pass-through socket set. Also, a pass-through socket set is often important and it would allow you to insert a tool (in this example, a long hex) to hold the strut rod stationary, while loosening the top nut of the strut rod. Generally, the rubber strut mount bearing assembly at the upper end should also be changed along with the strut, and it would be purchased separately. You can always follow the detailed instructions which would accompany your strut purchase for the best results.
There can be some vehicles where the disk brake caliper might need to be removed to gain clear access to the mounting bolts on the bottom-end of the strut. It would also be recommended to get the entire front-end, or entire rear-end off the ground (depending on which end you tackle first), especially for vehicles with sway bars. It would make the process of removal easier, as it relieves pressure from the sway bar, which may otherwise work against you.
You should then locate the strut which is generally mounted to the steering knuckle. There are generally two bolts at the base of the strut assembly through what looks like a large compression clamp around the base of the strut. Then you should remove these two lower mounting bolts.
If you would be working on the front struts, pop your hood to access the upper strut mount hardware (typically three nuts). The top three nuts should then be removed. At this point, the strut assembly should be loose and ready to remove from the vehicle. If the assembly would be too tight to remove, then you would need to compress the spring while it’s still sitting above the knuckle. You would most likely notice a large nut in the center of the strut assembly. Do not remove this, because it would be the only thing holding the spring to the strut mount bearing assembly and will be removed once the strut is freed from the vehicle as a complete unit.
A pair of coil spring compressors should be used to compress as many of the springs as possible. Then you should remove the spring. There might be a need to pry down the steering knuckle to remove the strut. While you would be working with a spring compressor, then you should apply pressure going side-to-side as you compress the spring. Avoid tightening one side, which would create uneven pressure on the spring.
Now that you would have the spring under pressure, then the top center nut should be removed on the strut rod. It might need the use of a pass-through socket set and Allen key to keep the rod from spinning while you remove the top nut.
Your net strut should be grabbed and then you should transfer the spring and hardware on the new strut, being sure to align the end of the spring coil with the notch in the base plate. The strut bushing should then be aligned onto the shaft of the strut, with the notch in the top plate covering the other end of the spring. Then you should tighten in place with the nut provided.
Now once the strut would be assembled and the top center rod nut has been tightened to hold the spring in place, then the coil spring compressors could be removed.
A new strut should be installed by loosely attaching the upper end of the strut by placing the captive bolts on the mount through the holes in the vehicle’s body.
The control arm should be pried and then align the lower strut clamp with the steering knuckle. The clamp should be attached to the steering knuckle with the same two bolts that you removed when taking the old one out.
After that you can securely tighten the upper bolts as well. The brake caliper should be re-installed if it was removed, and then you should pump up the brakes before you start driving.
Then you should re-install the front wheel and tighten the lug nuts. These procedures should be repeated for the other tires as well.
Buying Guides & Articles on Auto Parts
Articles and Guides written by auto parts experts to ensure you have all the required knowledge to make the correct purchase here at Parts Avatar.
Read all Guides & Articles