Discover Car Wheel Seal Kit
The wheel seal is a component that protects the wheel bearings in your car. Their purpose is to keep water and debris out of the wheel bearings, as well as to keep the grease in the bearings from leaking out. Wheel bearings are necessary for the smooth movement and rotation of your wheel. Learn more about the Wheel Seal Kit of your vehicle and how to properly maintain it.
What Is A Car Wheel Seal Kit?
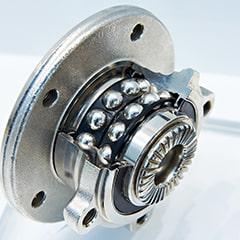
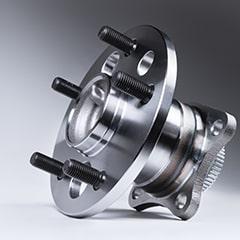
Your vehicle wheel has a wheel bearing, within which is a wheel seal. The reason to include the wheel seal kit is to keep the bearings lubricated properly and free from dirt, debris, and other materials that the bearings may come in contact with. In simple words, the wheel seal helps your wheels to function smoothly and increase their lifespan.
There are axle shafts present in the bearings which rotate so that they can work with minimum friction. They also bear the weight of the vehicle, for them to run smoothly they have to be lubricated and kept safe from dirt, grime, and debris. The reason for this is the lubricant (grease) because of its properties will catch and hold onto these contaminants, and when they grind into the bearings, they cause unwanted friction and reduce the life of the bearings significantly. This is when the wheel seals come into use. These wheel seals are pressed in a place over the wheel bearing, which allows a pocket of lubricant to encapsulate the bearing. We will know more about how all these components are placed and positioned so that they can perform their tasks.
Where Are All The Components Of Car Wheel Seal Kit Located?
The wheel seal kit is installed in the hub of the wheel above the bearing. The wheel seals are installed with the sealing lip facing the fluid to ensure a perfect seal. The wheel seals are installed with O-rings and are followed by a retainer.
What Type Of Materials Are Used In Making Car Wheel Seal Kit?
Some of the more recent seals are made of hydrogenated nitrile butyl rubber. The seals are resistant to attack and degradation by synthetic fluids and additives that can affect typical nitrile compounds. The substance is resistant to abrasives that might embed themselves in other compounds and cause leaks.
How Does My Car Wheel Seal Kit Work?
Here is the working of car wheel seal:
A wheel seal works in the same way as any other mechanical seal. It protects the area by covering it and keeping impurities out.
Keep in mind that the wheel seal's lip must face the liquid when installed for it to work. It's made to latch onto the fluid-filled side so that pressure can build between the bearing and the seal. This will also prevent the bearing from sliding off.
What Are The Symptoms Of a Bad Wheel Seal Kit?
Here are some symptoms that can be present when the wheel seal kit is not in good condition:
- Leakage of grease from the bearings – If you have a loose wheel seal, then grease can start escaping from the wheel bearing. If this happens, then the wheel seal won’t be able to perform properly as the wheels turn the centripetal force flings this grease around the wheel hub, and eventually leak onto the ground. If you notice oil on the floor or around the wheel hub, you should have it checked out by a professional technician. A torn CV boot could possibly be the cause of this problem. Either error will cause wheel assembly damage and will require prompt correction.
- Wheel seal that is visibly damaged – While doing its work, the wheel seal goes through a lot. It is damaged by potholes, road debris, and other factors. All of these things have the potential to shatter or dent the wheel seal housing. While it may be difficult for the average individual to notice a cracked or broken wheel seal, a professional will be able to do so quickly. If your mechanic has told you that the wheel seal is damaged, have it replaced and have him inspect the wheel bearings as well. The condition of the wheel bearings will determine whether they can be fixed or must be replaced.
- Tires and wheels are making noises – The wheel bearing will begin its painful journey due to a damaged wheel seal. The metal of the bearing will grind against the metal of the wheel hub if lubrication is lost. These sounds will sound like roars or grinding noises, and they will get louder as you accelerate the vehicle. Make sure that you get your wheel seal as well as the wheel bearing checked by a mechanic.
Which Tools Do I Need To Repair My Car Wheel Seal Kit?
Are you thinking of repairing your Wheel Seal Kit on your own? Then there is one thing which you must have, that is the right tools needed for repairing your Wheel Seal Kit. It is essential to make sure that you are outfitted with the right tools to get the work done properly. Have a look at some tools which you might need to get started with your repair work:
- Allen set metric and standard sockets
- Assorted pliers
- Assorted screwdrivers
- Breaker bar ½ Inch drive
- Brass hammer
- Combination wrench set, metric and standard
- Floor jack and jack stands
- Metric and standard socket set ½ inch drive
- Metric and standard wrench set
- Pry bar
- Ratchet ⅜ drive
- Seal remover
- Socket set metric and standard ⅜ drive and ¼ drive
- Torque wrench ⅜ or ½ drive
- Torx socket set
- Wheel socket set ½ inch drive
- Disposable gloves
- Emery cloth/sandpaper
- Flashlight
Which Top Brands Wheel Seal Kit Parts Should I Choose?
For vehicle owners' the brands matter a lot. You might pay for a specific car part brand, over time, as it has created a perception of quality, stability, and trust. Some leading car parts brands are more than just products or services as they give rise to memories and emotions related to quality. So have a look at some top brands for Wheel Seal Kit.
- Skf Wheel Seal Kit
- National Oil Seals Wheel Seal Kit
- Beck/Arnley Wheel Seal Kit
- Dorman Wheel Seal Kit
What Is The Repairing Cost Of My Car Wheel Seal Kit?
Wheel Seal Kit replacement cost can differ widely depending on the application, the brand of the Wheel Seal Kit as well as who does the work. All you have to do is to replace your faulty Wheel Seal Kit with us online and then you can leave your car to the mechanic and pick it up a few days later. Just be sure that the car mechanic is highly skilled and has an excellent reputation. Sometimes the additional service level might cost you more than what you have expected. We also recommend you to take pictures of your car before you leave it with them so that you are sure that later on it is returned to you in an unharmed condition. The cost of a wheel seal can range between $7-$70 and with other replacement costs, it can go up to $150.
What Are The Steps Of Changing My Car Wheel Seal Kit?
Here are some easy steps that will enable you to change your vehicle’s wheel seal kit:
Step 1 - Reinstallation preparation
Ensure your vehicle is on a leveled surface that is safe. Double-check the vehicle, it has to be on the parking brake.
Step 2 - Loosen the lug nuts
With the help of the ½ inch drive breaker bar and a lug nut socket set loosen all the lug nuts. Once that’s done, you can move on to the next step of jacking the vehicle.
Step 3 - Jacking the vehicle up
Using jack stands jack up the vehicle. The position of the vehicle should be such that the wheels are off to the side, away from the work area.
Step 4 - Removal of the old wheel seal
You’re now ready to disassemble the brakes. Start by removing the caliper bolts, then take off the caliper bracket so that you can get to the hub/rotor. You will see a cap on the end of the hub/rotor, pop it off smoothly using a thin chisel and hammer. If you don’t have these, you can use a set of large pliers and wiggle it off also. Remove the cotter pin which is locking the tab and the nut, this will help the rotor/hub to simply slide off the spindle. It will also ensure that the bearings and the seal remain attached. Grab your seal remover tool to pop the seal out of the back of the hub/rotor.
Step 5 - Reinstall the wheel bearings and wheel seal
Take your time and clean all the dirt and grime off the wheel bearings. Simply use a bearing packer and pack them with fresh grease. Pay special attention to cleaning the insides where the bearings will sit. Now you can put the rear bearing back in, using a seal installer/ socket which is big enough so that you can hammer the new seal back easily straight and flat. Carefully slide the hub/rotor back onto the spindle, and reinstall the front bearing and the washer and nut.
Be sure to tighten the nut down hand tight. Now spin the hub/rotor until it shows some resistance on it, you have to now back the nut off a bit and then install the nut guard and the cotter pin.
Using a hammer, put back the cap until it is flush. You can now reassemble the brakes. Carefully blot the brake caliper bracket to the spindle, and place the pads back onto the bracket. Now put the caliper back on and torque all the bolts to specification as per your vehicle manual.
Step 6 - Reinstalling the wheels
It’s time to put the wheels back onto the hubs using the lug nuts. Using a ratchet and socket snug them all down.
Step 7 - Jack the vehicle backs off the jack stands
Simply place the jack in the correct spot under the vehicle, now jack the car up until you can remove the jack stands. Lower the vehicle back onto the ground carefully.
Step 8 - Torque the wheels
Using a ½ inch torque wrench torque the lug nuts to the proper specification as per your vehicle.
Step 9 - Test drive the vehicle
It’s time to see if the installation was successful. Test drive the vehicle and note if it’s running smoothly. There should be no clicking or thumps in the front end.
Buying Guides & Articles on Auto Parts
Articles and Guides written by auto parts experts to ensure you have all the required knowledge to make the correct purchase here at Parts Avatar.
Read all Guides & Articles