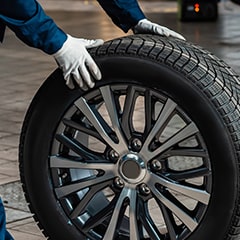
Discover Car Wheel Bearings
Wheel bearings are low-maintenance components, but they don't last permanently. So, what exactly does a wheel bearing do? How long is it going to last? And what can you do to make it live longer? Read along to understand more about your Car’s Wheel Bearings and their working mechanism better.
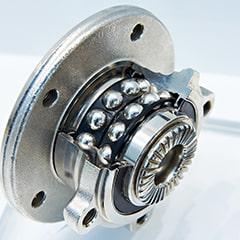
What Is A Car Wheel Bearing?
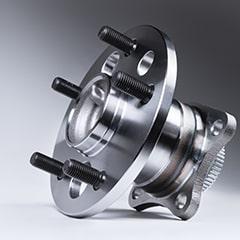
Wheel bearings are a significant component of your wheel. Typically, a wheel bearing is a set of steel balls that are held together by a metal ring known as a ‘race’. The job of the wheel bearings is to help the wheels spin fast with a minimum amount of friction.
You can locate the wheel bearing which will be visible on a metal axle shaft and it fits tightly inside the hub. The hub is a hollow chunk of metal at the center of the wheel. This hub holds the lug bolts, which are used to bolt the tire onto the wheel.
How Do My Car Wheel Bearings Work?
Have a look at the working of car wheel bearing:
The job of the wheel bearings is to perform two very important functions. It allows the wheel to rotate on minimum friction and also supports the weight of the vehicle. For them to do this, they need to be super conditioned. They should also be free from leaks to be able to keep the lubricant inside the bearings as the contaminants out of it.
A regular car will weigh around 3,400 lb., which means on average each pair of the front wheel bearings and as well as the real wheel axle bearings are supporting about 850 pounds. Which is a considerable amount of weight which needs to be supported as the vehicle is driven for tens of thousands of miles. The amount of weight that is distributed on the rear and front is dependent upon the vehicle's weight distribution.
What Are The Common Car Wheel Bearings Problems?
You may come across certain issues pertaining to the wheel
bearings, we have pointed out some of the frequently noted problems here:
1. Improper
Installation - In case you had your wheel bearings
installed recently, and they have caused trouble, it’s most likely because of
improper installation. Maybe the wheel bearings were not in good shape at the
time of installation or not as per the manufacturer’s recommendations.
2. Driving
Through Deep Water - Driving your vehicle in water
exposes them to moisture which they are not designed to keep safe from. The
petroleum-based lubricant used in the wheel bearing seals isn’t waterproof. And
hence they allow water to enter the wheel bearing. The water which mixes with
the lubricant does not allow the lubricant to do its job. Which will cause
excess friction for the bearings to handle, and ultimately damage them. Sadly,
the only solution to a wheel bearing that has been damaged due to water
exposure is to replace it completely.
3. Driving
on the rough roads - As you know the wheel bearings bear
the entire pressure of the vehicle's weight. When driving over bumpy curbs or
potholes the wheel bearings can get damaged. This happens because when the car
hits something, the bearing’s balls are likely to get forced into the race
(grooved ring where the bearing sits), which will cause small imperfections in
the bearings. With repeated driving over such rough surfaces, the heat and
friction will increase. With time the heat will result in a few tiny pieces
fall which pollute the lubricant of the wheel bearing. This will cause it to
fail much quicker; at times it may take a few months before it is noticeable.
4. Unbalanced
tires or bad Shocks - If you have unbalanced tires, then
some parts of your wheel system can get damaged, which will cause noise coming
from the wheel bearing. The whole wheel system depends on the wheel bearing,
tire, lower arm, lower joint, knuckle arm, and shock.
5. Accident on or near the wheel area - Any components of the wheel area when subjected to an accident can cause the wheel bearing to also get damaged. In such a scenario you can hear a noise from the wheel bearing.
Which Tools Do I Need To Repair My Car Wheel Bearings?
Do you want to repair your Wheel Bearings? If yes, then you surely need some tools to meet the demand of your car body structures. There is no need to worry, as we are here to help you out. Have a look at the tools below which you will need while repairing your Wheel Bearings.
- Gloves and Safety eyewear
- Pliers
- Ratchet
- Safety jack stand x 2
- Socket set (⅜ socket set 10mm-19mm)
- Torque wrench
- Wheel chock x 2
- Wire clothes hanger
- Bearing grease
- Diagonal cutters
- Floor jack
- Screwdriver
Which Top Brands Wheel Bearings Parts Should I Choose?
Searching for a specific brand for your Wheel Bearings? In that case, you have arrived at the correct place. All you have to do is have a look below:
- SKF Wheel Bearings
- Crown Automotive Jeep Replacement Wheel Bearings
- Auto Extra Wheel Bearings
- Dorman/Help Wheel Bearings
- World parts Hub Assemblies Wheel Bearings
- BCA Bearing Wheel Bearings
- Moog Wheel Bearings
To know more about top brand Car Wheel Bearings, visit our “What Are The Top Brands Of Wheel Bearings Should I Choose From?” section.
Which Parts Are Related To My Car Wheel Bearings?
We believe that an investment in knowledge pays the best interest. So why not learn more about the associated parts of the car Wheel Bearings?
- Wheel Bearing Module
- Wheel Hub Mounting Stud
- Wheel Bearing Dust Cap
- Rear Wheel Bearing Kits
- Wheel Bearing Lock Ring
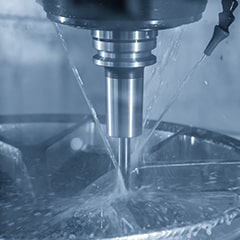
What Are The Steps Of Changing My Car Wheel Bearings?
Keen to know about the procedure of changing the Wheel Bearings? Well, we have simplified the entire procedure for you:
Follow these steps to change your vehicle's wheel bearings:
Step 1 - Preparing your vehicle in position
It is important to take all the necessary precautions before you proceed with the job. Park your vehicle on a level surface and put it in parking mode, ensuring the parking brake is up.
Step 2 - Secure the wheels
Make use of the wheel chocks to be able to secure the wheels whose bearings you are not replacing. The wheels you are going to be working on will be elevated off the ground.
Step 3 - Elevating the wheels
To do this you will have to loosen the lug nuts with the help of a tire iron. Once this is done, you can carefully lift your wheel. You can use the jack you got with your vehicle. In case you didn’t get one, purchase a suitable one.
Step 4 - Removal of the wheel
Unscrew the lug nuts you had loosened in the previous step and keep them in a safe place. Now you can proceed to carefully remove the wheel.
Step 5 - Removal of brake caliper
Make use of a socket and ratchet to remove the caliper’s bolts, once that’s done, using a screwdriver remove the caliper itself. Be careful while doing this, letting the caliper dangle freely can damage the brake hose. You can hook it on a secure part of the undercarriage or use a short length of string to tie it in place.
Step 6 - Removal of the dust cover, cotter pin, and castle nut
A dust cover is present in the center of the vehicle’s exposed rotor, this protects the components holding the rotor in place. You have to remove the rotor, the cap, and the component, remove this dust cover. Do this by simply gripping it with calipers and tapping the calipers with a hammer. Once you will find the castle nut, usually secured with a cotter pin. Remove the cotter pin with pliers or wire cutters, then unscrew the castle nut and remove it (and its washer). Keep all of these parts in a safe place.
Step 7 - Removal of the rotor
Put your thumb securely on the peg in the middle of the rotor assembly. Firmly yet gently bump the rotor itself with the palm of your other hand. This will cause the wheel's outer bearing to loosen or fall out. Now remove the outer bearing and then remove the rotor itself.
Step 8 - Removal of old hub
Several bolts will hold the hub wherein the wheel bearing is present. These bolts may be tricky to reach because they’re present in the undercarriage. Using a skinny socket wrench and/or a breaker bar to loosen and remove them. Once that’s done, take the hub off its axle.
Step 9 - Disassemble the hub assembly
To gain access to the bearings, take the hub apart. You can do this using a wrench (and/or a hammer) and remove the end of the hub. In any anti-lock brake wheel that may be part of your hub itself. Once that is done you may make use of a specialized "puller" tool to remove the central bolt. At this point, the bearing assembly should come apart pretty easily.
Step 10 - Removal of races and cleaning of the knuckle
Break the bearing assembly's races with a grinder or hammer and chisel. Keep the replacement races handy before doing this. Once they have been removed, clean the inside of the bearing assembly around the knuckle. You will find more grease and grime here, so it will be handy to have rags to do this job.
Step 11 - Installation of new races and new wheel bearings
Carefully set the new races in place in the bearing assembly, a few taps of hammer will do the job. Grease a new inner bearing and install it in the assembly. You have to pay special attention and make sure the bearings are properly aligned, that they're pushed in as far as they can go, and that any sealing rings are flush with the outside of the assembly. Be liberal with using the grease for your wheel bearings, do this simply by your hand or a ‘bearing packer’ tool. Rub a good amount of grease around the outsides of your bearings as well, and also on any sealing rings.
Step 12 - Replace everything in reverse order
Now you can simply rebuild your vehicle by tracing your steps backward. During this process, install a new outer bearing once the rotor is in place. Put the hub assembly back together and move on to installing the axle shaft on it. You can now put the rotor back on and secure it in place via bolts. Proceed further to installing a new well-greased outer bearing. Tighten the castle nut lightly and secure it in place with a new cotter pin. You can now replace the dust cap and also put the caliper and brake pads back in their place, remember to secure them with the right bolts. Now you can put the tire back on and secure it with the lug nuts. Once you’re done, lower the car back down, slowly and carefully.
If you are still confused about which type of car wheel bearings you should buy, then you can visit our The Ultimate Wheel Bearings Buying Guide. You should always look for the warning signs of bad wheel bearings and replace them at the earliest you can. With us, you can find wheel bearings at the most economical costs.
Buying Guides & Articles on Auto Parts
Articles and Guides written by auto parts experts to ensure you have all the required knowledge to make the correct purchase here at Parts Avatar.
Read all Guides & Articles