The Complete Hub Assembly Guide
The wheel hub assembly secures your wheel to your car and allows it to turn freely, allowing you to steer securely. The anti-lock braking system (ABS) and traction control systems (TCS) both rely on the wheel hub assembly. Read along to know more about your Car Hub Assembly and its associated functions.
What Is A Car Hub Assembly?
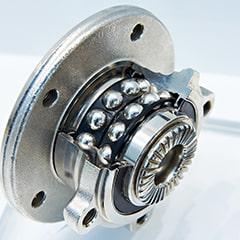
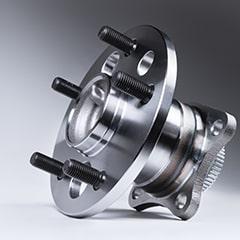
The steering wheel hub assembly is essentially the mounting assembly for the wheel of a vehicle. It is interchangeably also known as a hub assembly, wheel hub unit, wheel hub bearing, etc. It includes the wheel bearing and the support lugs.
In most of the newer vehicle models, you may also find a speed sensor and ABS sensor attached to the unit via an electrical connector. The job of the wheel hub is to keep the wheel spinning freely on the wheel bearing. The wheel hub is the major component that holds the wheels to the car and hence is very crucial to the vehicle. In this article, you will learn more about its location, functionality, and even how to install one on your own.
Where Is The Car Hub Assembly Located?
You can find the wheel hub assembly between the brake drums/discs, and the drive axle. A wheel is bolted to it. A roller bearing is present between the axle hub and the axle shaft, which ensures easy rotation of the non-drive wheels. On the axle side, it will be mounted to the holding bracket from the chassis on the disc side the wheel is mounted to the bolts of the wheel hub assembly.
How Does My Car Hub Assembly Work?
Willing to know the working of a car hub assembly? Keep on reading further.
One has to know that the hubs of the driven wheels differ from the undriven ones, even though they look similar. They are constructed differently because the drive hubs incorporate driveshafts too.
With a front-wheel-drive car, the hub has to perform two functions, one is to drive the wheels, and the second is to swivel so that the car can be steered. For this to be possible, the hub rotates in or next to a huge casting, which is known as the hub carrier. This carrier itself is mounted to the suspension via ball joints which allow it to swivel, as well as move up and down as per need to move on the road smooth.
The cars with MacPherson struts have a different setup in which the hub carrier has a ball joint present at the bottom, which is bolted to or is a part of the strut. The upper swivel is formed by the strut’s top mount where it joins the inner wing. The swivel of the hub carrier is controlled by the steering arm which is attached to the steering gear.
How To Choose The Right Wheel Hub Assembly?
Which Tools Do I Need To Repair My Car Hub Assembly?
To change the Hub Assembly you may need the following tools:
- ⅜ drive ratchet
- ⅜ drive socket set – metric and standard
- ⅜ or ½ drive torque wrench
- ½ Inch drive breaker bar
- ½ Inch drive wheel socket set
- ½ Inch drive metric and standard socket set
- Disposable gloves
- Flashlight
- Floor jack and jack stands
- Pry bar
- Allen set metric and standard sockets
- Axle nut socket set
- Brass hammer
- Combination wrench set, metric and standard
Which Top Brands Hub Assembly Parts Should I Choose?
Some leading car parts brands are more than just products or services as they give rise to memories and emotions related to the quality. So have a look at some top brands for Hub Assembly.
- WorldpartsHub Assemblies Hub Assembly
To know more about the top brand car Hub Assembly, visit our “Which Brand Hub Assemblies Should I Choose?” section.
What Are The Steps Of Changing My Car Hub Assembly?
You can find the steps for replacing the wheel hub assembly here:
Step 1 - Work area preparation
Ensure that the vehicle is on a leveled safe surface, and is set in the parking brake. Gather all your tools and manual if needed for reference. Make sure the manual is for your exact vehicle make and model.
Step 2 - Loosening the lug nuts
Using the ½ inch drive breaker bar and a lug nut socket set, loosen all the lug nuts and axle nuts (if applicable). This has to be done before you jack the vehicle up in the air.
Step 3 - Jack up the vehicle
Use jack stands to do this and place the wheel off to the other side, away from the work area.
Step 4 - Removal of the old wheel hub assembly
Start by removing the axle nut (if present) and then disassemble the brakes by removing the caliper and bracket bolts. Now you can remove the rotor. Check if the vehicle has anti-lock brakes, if it does, then disconnect any wiring harness plugs. You can now loosen all the bolts which are holding the assembly onto the knuckle. You should be able to remove the whole wheel hub assembly as a unit once this is done.
Step 5 - Install new wheel hub assembly and brake parts
You can now trace back from steps, start by bolting the new wheel hub assembly to the knuckle. Be careful and connect the ABS sensor connector if it was present. Torque the bolts as per vehicle specifications. Install the roto back, and start reassembling the brakes. Now you are ready to install the brake bracket back to the knuckle. Torque it and then install the pads and the caliper back onto the bracket. Reinstall the axle nut (if needed).
Step 6 - Reinstalling of the wheels
Using the lug nuts place the wheel back onto the hubs. Carefully snug them down using a ratchet and socket.
Step 7 - Jack the vehicle off the jack stands
Using the same jack, place it in the correct spot under the vehicle. Jack up the car till you can remove the jack stands. You can now carefully lower your vehicle onto the ground.
Step 8 - Torque the wheels
Use a ½ inch torque wrench and torque the lug nuts to the proper specification. A lot of the cars use a torque from 80 ft-lbs. to 100 ft-lbs., the SUV and trucks will be higher. So, it’s important to refer to your specific vehicle's manual for the information.
Step 9 - Test drive
Pump the brake pedal a few times. This will help the brake pads to reset to the rotor. This is important to seat the brake pads properly against the brake rotor. Pay attention to any noises that may come from the hub bearing. If you hear no sounds, this will be a sign of a successful replacement.
If you are still confused about which type of car Hub Assembly you should buy, then you can visit our The Ultimate Hub Assembly Buying Guide. You should always look for the warning signs of a bad hub assembly and replace them at the earliest you can. With us, you can find hub assembly at the most economical costs.
Buying Guides & Articles on Auto Parts
Articles and Guides written by auto parts experts to ensure you have all the required knowledge to make the correct purchase here at Parts Avatar.
Read all Guides & Articles