Stepwise Guide: How To Replace Your Car Wheel Bearings?
Wheel bearings allow the wheels to spin smoothly and last a long time. However, constant stresses, exposure to dirt and grime, and prolonged operation cause the wheel bearings to wear out. You might notice symptoms of worn-out wheel bearings like moaning or humming sounds.
If wheel bearings wear out, they cannot hold the wheel firmly and can lead to loss of steering control and allow the wheel to come off in worse situations. If you notice these signs, you should check your wheel bearings. Read on, if you think you are up for the task and you can replace your wheel bearings yourself. This article will guide you through a stepwise method on how to install wheel bearings properly.
In this article:
Why Do You Need To Replace Wheel Bearings?
One of the major reasons wheel bearings go bad is because of bad roads, when you hit a pothole, or when you hit a speed bump. Although your suspension system absorbs most of the shock caused by such a situation, some of it is transferred to the wheel bearings, which can damage the ball bearings inside. Another reason is a bad seal that lets water and dust enter inside the wheel bearing housing, which accelerates wear and tear and requires a new wheel bearing installation.
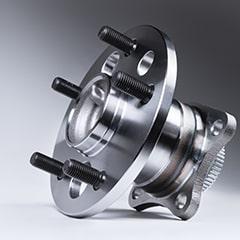
You can also replace the entire wheel hub assembly, which includes ABS sensors, wheel bearings, hub seals, and dust caps. Instead of replacing just the wheel bearing, which can be difficult, you can replace the complete wheel hub assembly and avoid future repairs and installation issues.
Stepwise Guide On How to Replace A Wheel Bearing
Unlike replacing a wheel hub assembly, changing a wheel bearing can be a little challenging. Although this guide includes all the essential steps to replace your wheel bearing, it's advised that you consult your service manual for detailed steps and precise instructions. If you plan on replacing the complete wheel hub assembly, refer to our ultimate wheel hub assembly installation guide.
Tools Required:
Floor Jack or Transmission Jack
Step 1 : Lift The Car
First, loosen the lug nuts but do not remove them completely. Secure the wheel by leaving a lug nut on so that the wheel doesn't fall unexpectedly when you lift the car with a jack or a hydraulic lift. Position the jack according to the owner's manual’s instructions for changing a tire. Lift the car using the jack, and place the jack stands under the car for stability.
Step 2 : Remove The Wheel
After lifting the vehicle, position yourself in such a way that you can lift the wheel. Unscrew the remaining lug nuts and remove the wheel. It's a good idea to place your wheels under the car for added safety.
Step 3 : Remove The Brake Caliper
Start by removing the brake caliper bracket bolts by using a set of ratchet and sockets of appropriate size. Then, with the help of a flathead screwdriver or a small prying tool, remove the brake caliper. Make sure you don’t let the caliper dangle freely. Use a bungee cord or a zip tie to tie it somewhere securely, or else it can damage the brake lines.
Step 4 : Remove The Brake Rotor
Loosen the screws that hold the brake rotor in place. This step may vary from vehicle to vehicle, as some brake discs just need some hammering, and in some cases, it needs you to use an external bolt to screw it in, which will push the brake disc backward.
Step 5 : Loosen The Axle Nut
After removing the brake rotor, loosen the castle nut, also known as the axle nut located in the middle of the wheel hub. In some vehicles, it may be covered with a dust cap, which can be easily removed by prying it open with a screwdriver. To loosen the axle nut, first remove the cotter pin, then use an appropriate size socket and a pry bar to prevent the wheel from rotating. Position yourself in such a way that you can hold the pry bar and loosen the socket simultaneously.
Step 6 : Uninstall The Wheel Hub
Step 7 : Disassemble The Hub Assembly
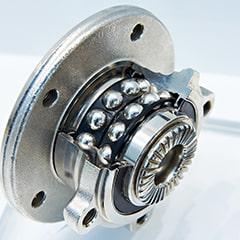
The hub assembly is further disassembled to gain access to the bearing. First, remove the circlip with a circlip plier, which locks the plate that covers the bearing in place. Make sure to remove the ABS sensor wire first to avoid accidentally damaging it. After doing this, you may need a special wheel bearing puller tool to remove the bearing. However, you can also use a hammer and a slightly smaller size socket, which you can keep on top of the outer part of the bearing and hit with a hammer.
| Ford F150 (2004-2008) | Use a 13mm socket to loosen the bolts that hold the caliper. Then use an 18mm socket to loosen the 4 bolts that hold the wheel hub to the spindle. Lastly, use a 13mm socket to loosen the CV axle bolt, which will then separate the wheel hub. Then use a puller tool to disassemble the old wheel bearing and install the new one. |
| Dodge Ram 1500 (2012-2017) | Use a 21mm socket to loosen the caliper bolts. Then use a 36mm socket to loosen the CV axle bolt, along with a 21mm socket to loosen the axle from behind as well. It will come out with a gentle tap on the wheel hub. Then use a 19mm socket to loosen the nuts at the back of the knuckle to loosen the wheel hub. Then use a puller tool to disassemble the old wheel bearing and install a new one. |
| Chevrolet Silverado 1500 (2007-2015) | Use a 35mm socket to loosen the CV axle nut and an 18mm wrench to loosen the upper ball joint nut. Then use a 15mm socket to loosen the three bolts holding the wheel hub. Then use a puller tool to disassemble the old wheel bearing and install a new one. |
| Chevrolet Silverado 2500 (1999-2007) | Use a 21mm socket to loosen the brake caliper bolts. Then use a 36mm socket and a 15mm socket to loosen the CV axle nut and the 4 bolts from behind the knuckle that hold the wheel hub, respectively. Then use a puller tool to disassemble the old wheel bearing and install a new one. |
| Honda Civic (2003-2005) | Use a 32mm socket to loosen the axle bolts and a 17mm socket to loosen the caliper bracket bolts. In this case, you may need a special tool to remove the wheel hub from the knuckle. Then use a puller tool to disassemble the old wheel bearing and install a new one. |
| Toyota Corolla (1995-1999) | Use a 17mm socket to loosen the caliper bolts. Then use a 30mm socket to loosen the axle nuts. After that, remove the knuckle by using a 15,18, and 19mm socket for the top 4 nuts that hold the knuckle, and a 17mm socket to loosen the three nuts of the lower ball joint to free up the knuckle. Then use a puller tool to disassemble the old wheel bearing and install the new one. |
| Volkswagen Jetta (2006-2010) | Use an M18 Triple square bit to loosen the wheel hub. After doing so, the wheel hub will slide out easily. Then use a puller tool to disassemble the old wheel bearing and install a new one. |
| Hyundai Elantra (2011-2016) | Use a 14mm wrench to loosen the caliper bolts. Then use a Phillips-head screwdriver to loosen the screw holding the disc to the hub. After that, use a 12mm socket to loosen the 4 bolts holding the wheel hub. Then use a puller tool to disassemble the old wheel bearing and install the new one. |
| GMC Sierra 1500 (2007-2013) | Use a 36mm socket to loosen the axle nut. Then use an 18mm socket to loosen the bracket and a T30 Torx bit to loosen the brake rotors. Lastly, use a 15mm socket to loosen the bolts holding the wheel hub. Then use a puller tool to disassemble the old wheel bearing and install the new one. |
| Mazda 3 Series (2004-2013) | Use a T45 to loosen the brake caliper bolts. Then use a T50 to loosen the 4 bolts that hold the wheel hub from behind the knuckle. Then use a puller tool to disassemble the old wheel bearing and install a new one. |
Step 8 : Prepare The Knuckle For New Bearings
After removing the old bearings, you need to remove the old races too. You can remove the old races using a hammer and chisel or use a grinder to cut them off completely. After doing so, perform a thorough cleanup of the knuckle where the bearings sit. You can carry out this process by cleaning it with a degreaser to clean out all the old grease and gunk. After doing so, apply fresh grease.
Step 9 : Install New Wheel Bearing
Before installing the new set of bearings, cleaning, and greasing are very important as they will make the installation easy and hassle-free. Start by installing the new wheel bearing races into the wheel hub assembly. You might need a hammer to seat it properly and ensure it's snug. When the races are correctly positioned, install the wheel bearings. Apply enough grease to pack your bearings perfectly, or you can also use a special bearing packer tool.
Step 10 : Reinstall All The Parts In Reverse Order
After installing the new wheel bearings, reinstall the brake caliper, brake rotor, axle nut, wheel hub, and bearings in reverse order and tighten up to the correct torque specifications. Finally, install the wheels, bring your vehicle down, and remove the jacks. Repeat the same steps if you want to replace the rear wheel bearings.
Step 11 : Test Drive Your Vehicle
Finally, take the vehicle out for a short spin and drive it like you usually do. While doing so, look for symptoms of bad wheel bearings like strange noises such as clunking, clicking, or squeaking, especially when the vehicle is accelerating or going over potholes. If you notice no noises or symptoms of a bad wheel bearing, you have successfully completed the job.
Buying Guides & Articles on Auto Parts
Articles and Guides written by auto parts experts to ensure you have all the required knowledge to make the correct purchase here at Parts Avatar.
Read all Guides & Articles